Learning center
Rivendale’s Custom Home Building Process: From First Contact to Move-In

By
Chris Peterson
July 1, 2026
TLDR: A Rivendale custom home takes about 15–22 months from first contact to move-in, because the process front-loads the decisions that drive design and cost. Nearly 90% of what shapes your home is settled during pre-construction, with no obligation to build with us afterward. Because we complete 20 homes a year, we price from real, current cost data, often 10–20% below other builders, and verify every build against nearly 1,000 quality checkpoints, all backed by a layered 1-, 2-, and 10-year warranty.
There’s something rare about building a custom home. Instead of adapting your life to a house someone else designed, you get to shape every space around how you actually live — your routines, your taste, how you want to spend the next chapter of your life.
It’s also a meaningful undertaking, with hundreds of decisions between the first sketch and move-in day. That’s precisely where a builder earns their keep. For more than three decades, Rivendale has built a process around obsessive budget control and estimates drawn from real, current cost data — turning what could feel overwhelming into something genuinely enjoyable.
At every step, you’ll know exactly where your project stands, what’s coming next, how your budget is being managed, and who is guiding each part of the way. That clarity keeps your build moving smoothly and protects you from miscommunication and costly surprises that can derail less organized projects.
This article walks you through the full journey — from the first conversation to the keys in your hand, and the warranty support that continues long after.
Most people picture homebuilding as what happens on the jobsite. In reality, at least 90% of the decisions that determine your home — its design, its finishes, and its final cost — are made before construction begins. Pre-construction is where we get all of it right on paper: the plans, the selections, the budget, and the permits. It's the difference between a build that runs smoothly and one filled with costly surprises, unnecessary delays, and frustrating challenges.
Step 1: Initial Consultation and an Early Estimate
The first step is simple: schedule a consultation through our website, or call our sales team directly. Booking online is easiest, since it links straight to our team’s calendar. Ideally you’ll already have your lot — but you don’t need one to start the conversation. If you’re still searching, our Learning Center covers how to evaluate a lot and how to budget for land within your overall custom home budget, so you can come to the table informed.
Some clients come to us with finished plans and want a second opinion; others are starting from a rough vision. Either way, one of the first things we do is confirm the lot is actually buildable — because owning a lot and being able to build the home you want on it aren’t always the same thing. A site might have heritage trees that can’t be removed, less impervious cover remaining than the footprint requires, or a slope that won’t accommodate the square footage you have in mind. We assess this early, before anyone has invested months or money, so we never put you in the position of designing a home your lot can’t support. From there, we work to understand your goals, your must-haves, and your budget.
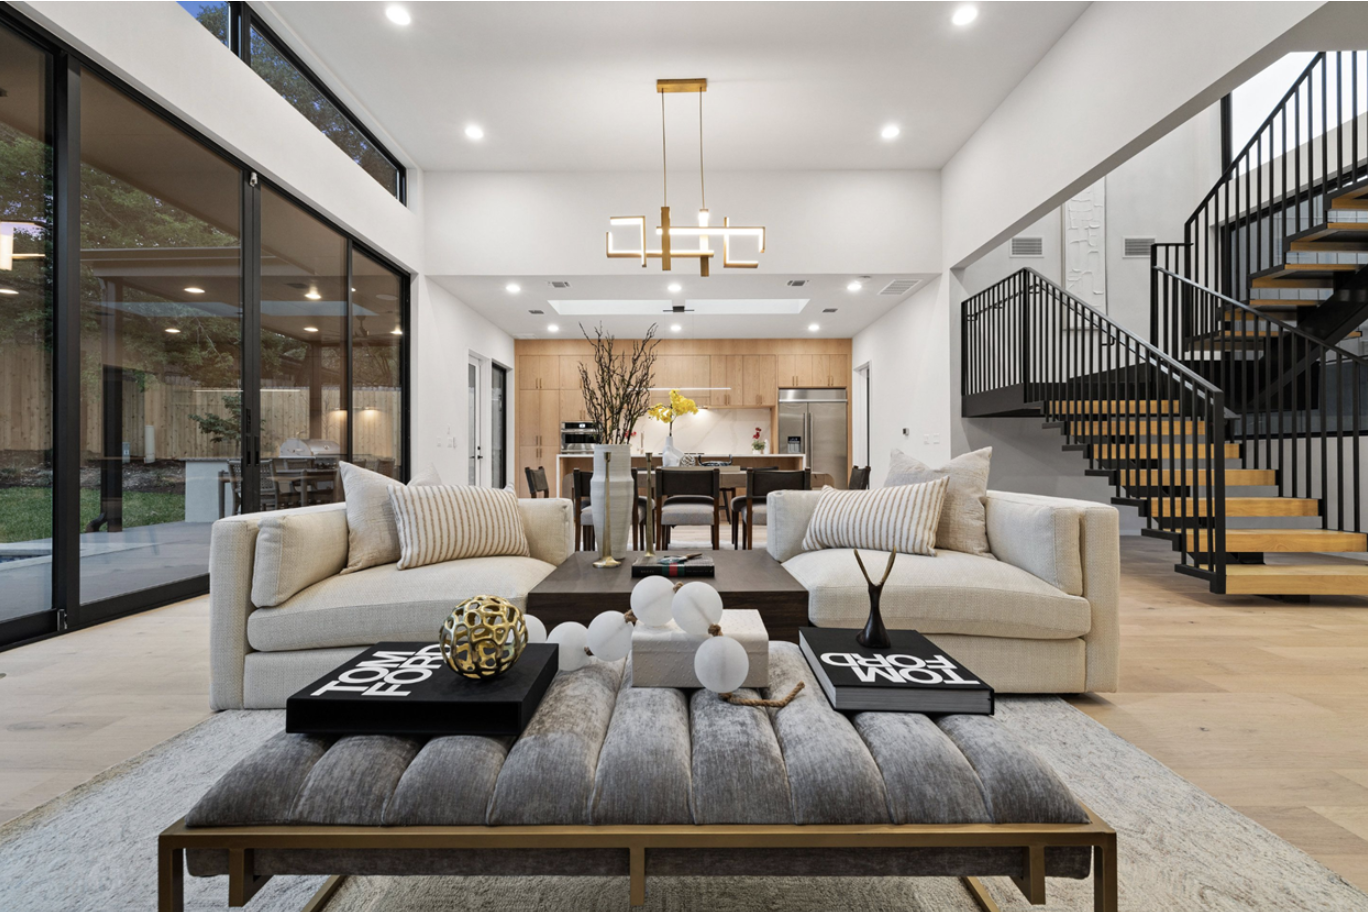
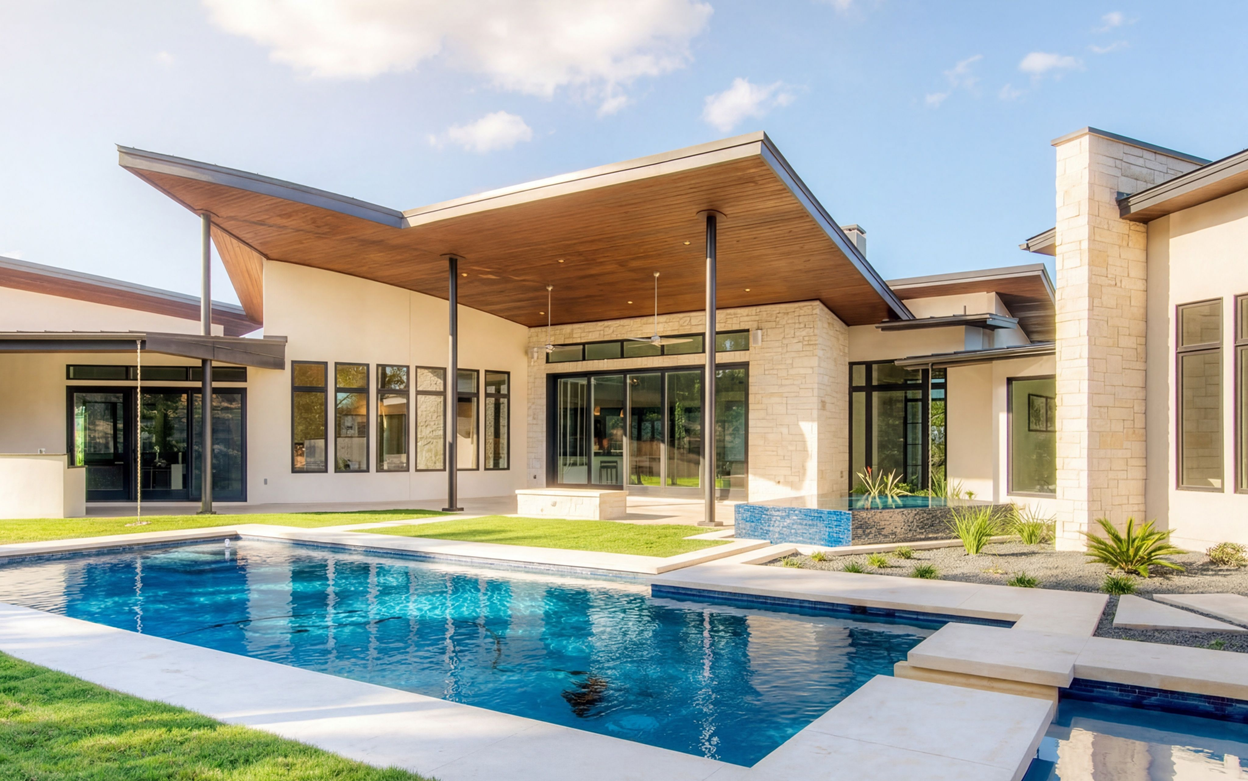
The initial consultation focuses on how the client lives now and what they want in the new home. Because we build a high volume of homes every year, we have multiple completed homes available to tour, which is a unique advantage for our clients.
Touring a completed home helps clients understand the layout, scale, finish level, and overall feel of the kind of home they want to build in a way floor plans alone cannot. It also gives our team a home to use as a pricing benchmark.
Immediately after the first consultation, Ben Goudy, Vice President of Operations, provides an initial estimate using historical cost data from the reference home.
Because we build so many homes, we are working from a larger body of current, real-world cost data, which allows us to give clients a stronger early pricing estimate than builders who do not have that same volume of comparable projects.
At this point, the client is not yet locked into a pre-construction contract, as we believe our clients should have a clear understanding of cost before making a formal commitment to Rivendale as their builder.
Step 2: Signing the Builder Consulting Agreement
The next step is to sign the Builder Consulting Agreement, which covers your entire pre-construction phase — planning, budgeting, and design — with no obligation to build with us when it's complete. At the end of that phase, the choice is yours: move forward with Rivendale, or take the plans you've paid for to another builder.
We structure it this way because we're confident in the outcome. Our process, our standards, and the care we take protecting your budget along the way are what earn your business — not a contract that leaves you no other option.
Step 3: Land Evaluation & Architectural Design
Land Evaluation. Every custom home starts with the land. Before design begins, your builder and architect walk the site together, because what your lot allows shapes everything that follows — what you can build, where it sits, and what it costs. We study slope and topography (which drive foundation type and whether your footprint fits), map heritage and protected trees that can't be removed, and work through setbacks, easements, impervious-cover limits, watershed rules, and utility access.
We also arrange geotechnical soil testing — essential in Central Texas, where expansive clay and shallow limestone dictate how your foundation must be engineered. The result is a clear picture of what your lot can support before we draw a single plan, so there are no expensive surprises once construction begins.
We then begin work to design the home. This is the stage where the client is most involved.
The client helps define the main aspects of the home such as square footage, bedroom and bathroom count, and layout priorities. The design is informed not just by the lot, but by how our client wants the home to support their daily lifestyle.
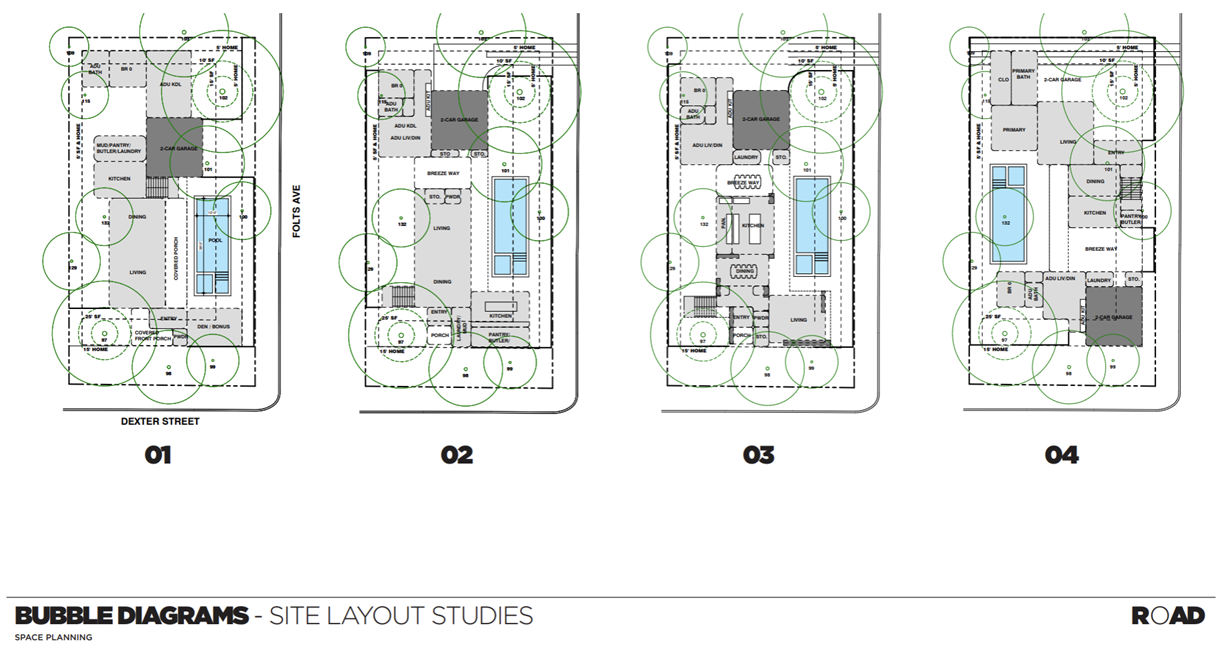
Step 4: Review Architectural Designs
The first designs are conceptual, bubble diagrams that help clients evaluate how the house should sit on the lot, where the garage should go, how outdoor spaces should connect to the home, and how the overall layout should feel.
These early drawings are meant to establish direction before the plans become more detailed.
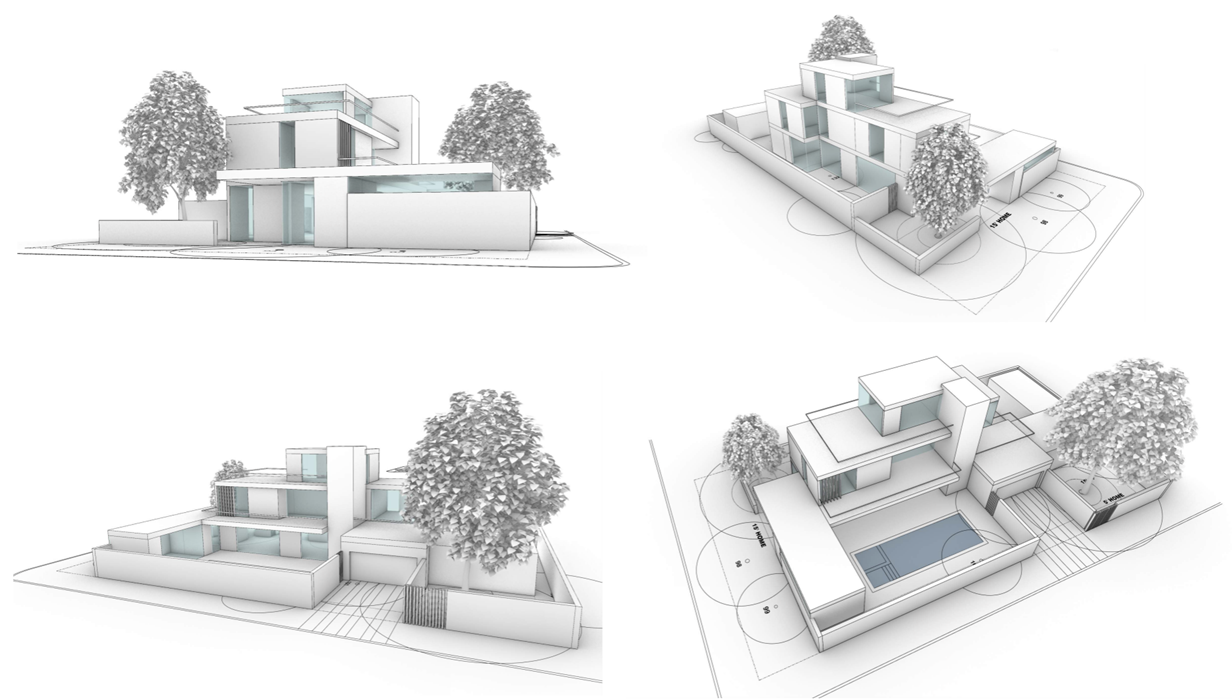
The architect then prepares 3D renderings, a more refined design of the home that helps clients better understand how the home will look. During this stage, we use our historical cost data to provide our clients with a clear understanding of how different design choices can affect the cost. Because of our expertise and more than 30 years of building experience, we’re able to provide highly accurate pricing guidance, helping reduce the risk of cost overruns.
This results in more cost transparency from the beginning and a clearer understanding of what their home will cost before construction begins.
Step 5: Introduction Meeting with Interior Designer
Once the initial architectural plans are established, we will introduce our client to our preferred interior designer. The designer works closely with the client to understand their style, preferences, and priorities. While some preparation begins now, most of the selection coordination happens in the next step, once the plans are complete.
Step 6: Selections, Pricing, and Permits
Once the architect delivers a complete set of plans, the project moves into selections, pricing, and permitting. For many clients, this is the most exciting part of the process. It's when their vision starts to feel real as they choose the materials, finishes, and design details of their new home.
Selections. Our interior designer guides clients through every step of the selection process, accompanying them to showrooms like Ferguson and ProSource while providing expert guidance to help them make decisions that align with both their vision and their budget.
Selections are scheduled based on material lead times and when each item is needed during construction. For instance, exterior masonry, fireplaces, plumbing fixtures, and appliances come first because they often have longer lead times and are needed earlier in the construction process. Electrical-related selections, like low-voltage wiring, speaker placement, and security systems follow shortly after. Flooring, tile, paint, and other finish selections are a work in progress throughout the build.
Behind the scenes, our purchasing team works closely with our designer to manage the budget, coordinate orders, monitor lead times, and track product availability. By following this strategic selection timeline, we keep the building process organized, minimize delays, and ensure all materials are ready when needed.
Bidding. As clients decide on materials and finishes, Rivendale's purchasing team collects bids from subcontractors and preferred vendors to create an itemized budget. We provide our clients with competitive pricing, often 10–20% lower than other builders, because of our strong vendor relationships, our ability to remove middlemen from material purchasing, and our lean building system designed to reduce waste and unnecessary markups.
Permits. Rivendale handles obtaining all building permits for the client by preparing and submitting the documentation required.
Step 7: Prepare for Construction
At the conclusion of pre-construction, Rivendale can execute a construction contract and begin building. The client may choose to move forward by signing a building contract and beginning construction, or they may choose to pause or step away from the project with their design as outlined in the consulting agreement.
Pre-construction concludes once the client is ready to transition from planning into building. Expectations around scope, cost, and process are clearly defined, significantly reducing uncertainty and minimizing avoidable surprises once construction begins.
Once the contract is signed, the client's construction loan is finalized and funded, construction officially starts.
Step 8: Meet the Construction Team and Receive Milestone-Based Schedule
Once construction is ready to begin, Ben connects the client with Rivendale’s Vice President of Construction, Gama Cancino, who introduces the 9-12 month construction phase and answers the first question most homeowners ask: how long the home will take.
During this onboarding stage, Gama also explains how the client will be kept informed throughout the build, including weekly or biweekly updates, monthly budget updates, and regular communication through email, photos, videos, and weekly on-site walkthroughs.
Milestone-Based Schedule
After onboarding, Gama shares a milestone-based construction schedule that gives clients a clear view of when the home is expected to move through each major phase of the build. The schedule focuses on these key milestones:
If a client wants more detail, Gama can also provide a more specific day-to-day schedule of the steps leading up to each milestone.
Step 9: Begin with the Foundation
The first major construction milestone is the foundation, which is poured during the first 30 days. We send regular updates and have meetings with homeowners on site so they can follow our progress from the very beginning.
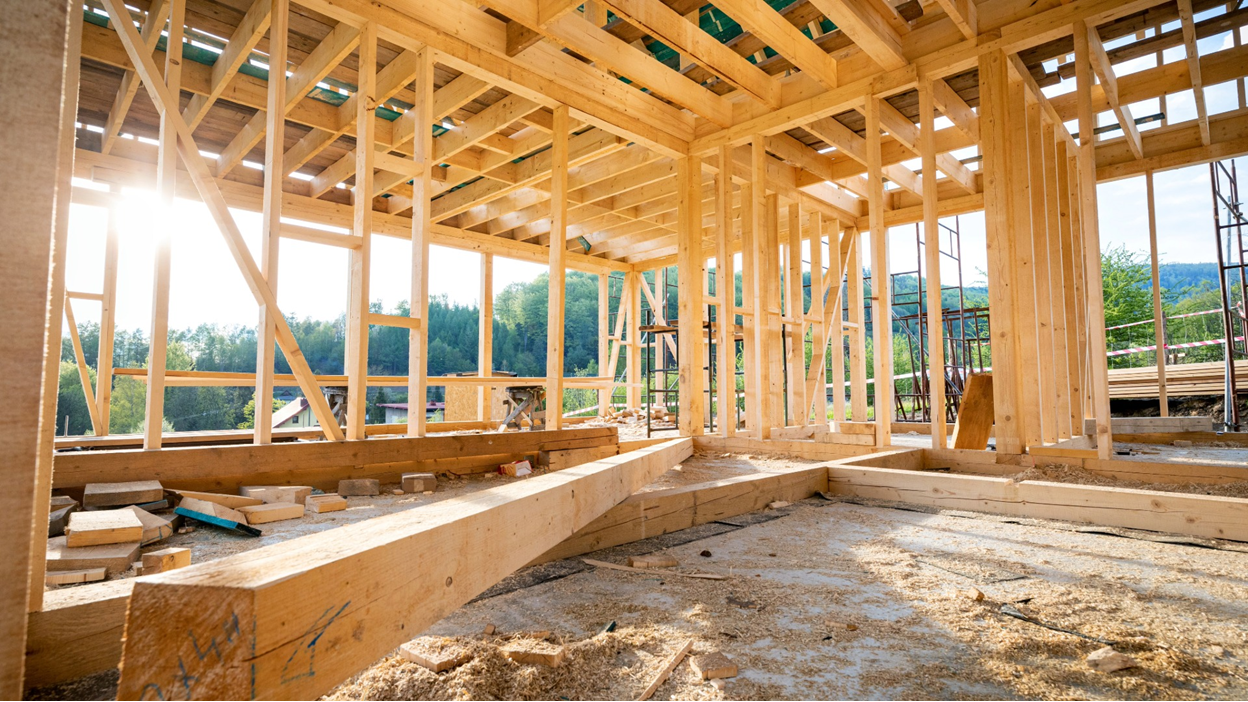
Step 10: Framing and Rough-Ins
After the foundation, the team works on framing, which typically takes about three to four weeks depending on the project. From there, we move into the mechanical rough-in stage, when our team works on major systems like electrical and HVAC.
Step 11: Complete the Interior Build Stages
Once the rough-ins are done, the project moves through insulation and drywall, followed by interior finish stages such as wood and tile, trim, and paint.
During this part of the process, Rivendale also keeps clients updated on any selections or decisions that still need to be made, providing clear deadlines when those decisions could affect the schedule. Clients also receive monthly budget updates so they can track how the project is progressing financially as well as physically.
Step 12: Enter the Final Construction Stretch
As we get closer to the end of the construction timeline, the electrical power is turned on, we are 45 days away from closing, and most of the quality control work has already taken place.
Throughout construction, Rivendale's construction team verifies work using a detailed quality control system with nearly 1,000 checkpoints per home, which reduces rework or mistakes, and prevents schedule delays across every stage of the build.
For homeowners, that means peace of mind and greater confidence that their home is being built according to plan long before the final walkthrough.
Step 13: Final Walkthrough and Punch List
Before closing day, Rivendale conducts a final walkthrough with the homeowner to review the home in detail and identify any remaining items that need attention. This walkthrough typically happens about two to three weeks before key handover and may also include a third-party inspector if the homeowner chooses.
Any cosmetic flaws, defects, or unfinished details are documented on a punch list so the team can complete them before move-in.
After the walkthrough, Rivendale works to complete the remaining punch list items, aiming to finish them within two weeks. The goal is to have no pending items left by the time the homeowner receives the keys; this process aligns with our commitment to customer satisfaction.
Step 14: Final Verification
Once the punch list is addressed, our clients complete a final walk to confirm everything has been completed as promised. Throughout this stage, the team provides updates and photos to keep the homeowner informed on progress.
Step 15: Closing Day and Key Handover
On closing day, the homeowner goes to the title company to pick up the keys. Any construction-related documents are reviewed and signed with Rivendale beforehand as part of the final completion process.
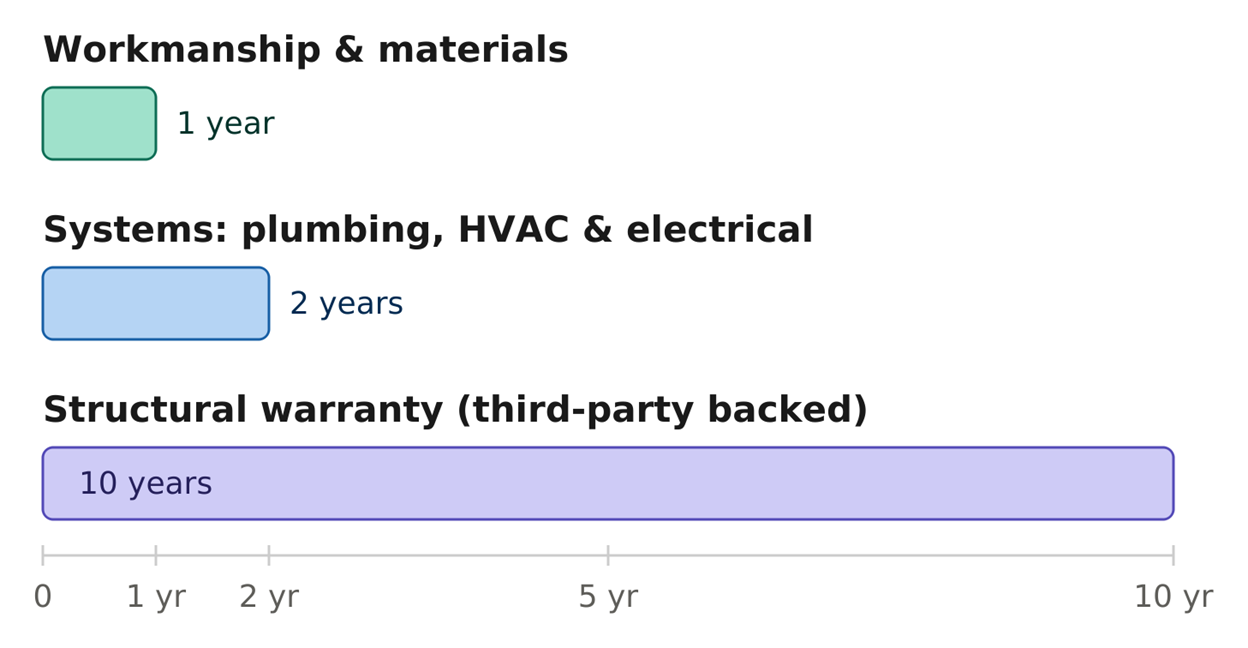
We view warranty service and long-term support as a direct reflection of our dedication to exceptional customer service. Every home includes a written warranty with clearly defined coverage and performance standards.
Homeowners receive a one-year workmanship and materials warranty, a two-year systems warranty covering plumbing, HVAC, and electrical components, and a 10-year structural warranty backed by a third-party provider.
Our goal is to provide clarity and peace of mind long after construction is complete. For example, during a winter freeze, a homeowner who was traveling out of state called because they were concerned about their home, so we personally stopped by to confirm that the water was turned off and the pipes didn’t break. This reflects the level of responsiveness and peace of mind we strive to provide.
Communication remains a priority after move-in. Our goal is to respond to warranty requests within 24 hours and keep homeowners informed throughout the resolution process. Whether a repair requires a simple adjustment or coordination with a trade partner, homeowners know what changes are happening and what to expect next.
Because we've been building homes for decades, many of our relationships with homeowners continue long after move-in day. Our in-house team remains available to answer questions, address concerns, and provide support whenever needed.
For us, great customer service isn't limited to construction. It's part of the long-term relationship we strive to build with every homeowner.
What neighborhoods does Rivendale build in? Most of our homes are in Austin’s established close-in neighborhoods, including Allandale, NW Hills, Tarrytown, Westlake, Barton Hills, Zilker, and Rosedale. We’re also happy to consider lots anywhere within about a 45-minute drive of downtown Austin, so if you’ve found a site you love a little further out, reach out and we’ll take a look.
What does a Rivendale home cost? Most of our custom homes fall in the $2M–$6M range, once you have your lot. Where a specific project lands depends on a number of factors — the size and finish level of the home, site conditions, and the selections you make along the way — which is exactly what our early estimate process is built to pin down. If you’d like to understand what drives the number, we break it down across several articles in our Learning Center.
How long does a custom build take? Most custom homes take approximately 15 to 22 months from first contact to move-in. The pre-construction phase typically lasts six to ten months. Construction generally takes an additional nine to twelve months.
What does the warranty cover? Every custom Rivendale home is backed by the T.A.B. Home Warranty program, covering structural elements, mechanical systems, and finishes. Submit requests directly through our website, and our in-house team handles them.
How do I get started? Please call (512) 865-5369 to reach our sales team.
We are happy to help whether you already have plans in hand or are just beginning to explore custom homes. If you have purchased a lot, reach out to our team to discuss site feasibility, budget expectations, and next steps.
How We Reduce Construction Errors
Chris Peterson is the owner of Rivendale Homes and has overseen the construction of more than 1,000 homes since founding the company in 1994. He is passionate about fostering a culture of exceptional customer service through comprehensive employee training and ongoing mentorship.
A dedicated father of five, Chris enjoys spending time with his family in Austin and on their annual trips, as well as staying active with water skiing and regular workouts.
He is also committed to strengthening the homebuilding industry, having served on the boards of his local homebuilders' association and the Austin Infill Builders Association for a combined 28 years.